YouTube is a powerful platform, there’s no doubt about that. So it’s really no surprise that more and more people have become interested in making and growing a YouTube channel of their own.
Creating content for a YouTube channel can mean the start of building a library of accessible content that shows up and ranks in both Google and YouTube. Even if you upload a video to your channel today, it could rank on both platforms for YEARS down the road.
Starting a YouTube Channel can be a daunting task, especially if you’re brand new to the platform. That’s why we’ve created this step-by-step guide on how to create a YouTube channel to walk you through the process.
Not only will we be covering the exact steps for how to create a YouTube account, but we’ll also provide you with tips on how to optimize your channel to maximize your traffic from the get-go.
12 Key Tasks to Start a Successful YouTube Channel
In this guide, we will focus on 12 different tasks to help you create an awesome channel:
1: How to Create a YouTube Account
Since YouTube is owned by Google, the first step to starting a YouTube channel is to create (or sign in to) your Google account.
To do this, head to the YouTube home screen and click the Sign In button located at the top right corner of the screen. This will take you directly to the Google sign-in page, so either sign in to your existing account or click Create account.
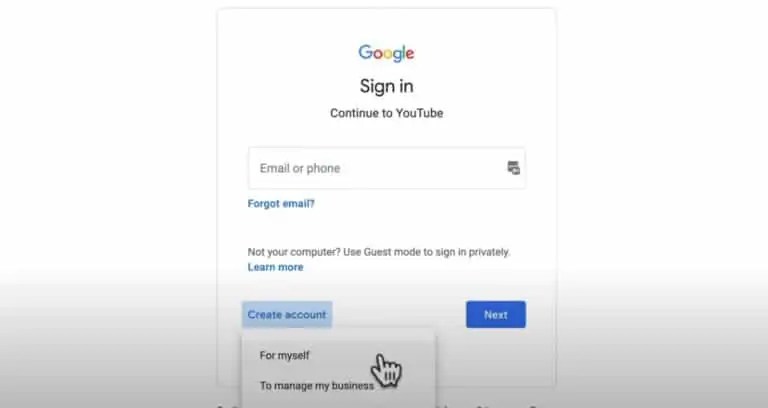
After clicking the Create account button, you’ll be prompted to choose either For myself or To manage my business. The one you choose won’t affect your YouTube channel, so just consider whether you want to use an affiliated email with a first and last name or a company domain.
Next Step: Create Your Channel
Once you’ve signed in or created a new account, click on your profile picture or letter icon at the top right corner. In the drop-down menu, you’ll see a button that says Create a channel. However, this might not be visible if you already had a Google account.
If that’s the case, click on your profile icon and select Settings from the drop-down menu. From here, select the link that says Add or manage your channel(s), which will take you to a page with a Create a Channel button.
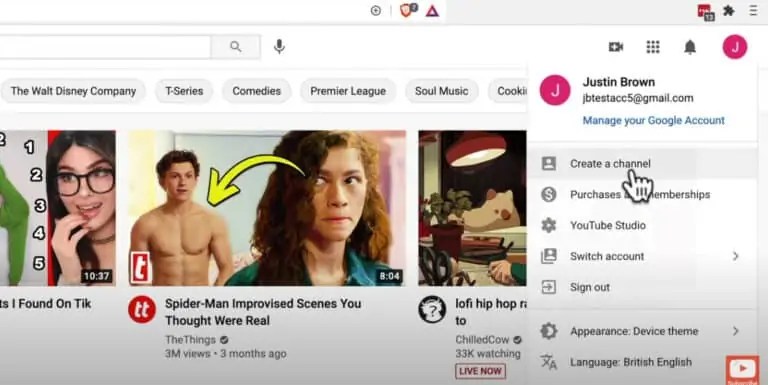
Some of you might already have a few channels associated with your YouTube account, so if that’s the case, you’ll just move on to create a brand new brand channel. If this is your very first channel, you have the option to choose either a personal or brand channel
What’s the Difference Between a Brand Channel and a Personal Channel?
A personal YouTube channel can only be named based on the user’s first and last name and it only allows for one account manager (so one linked email).
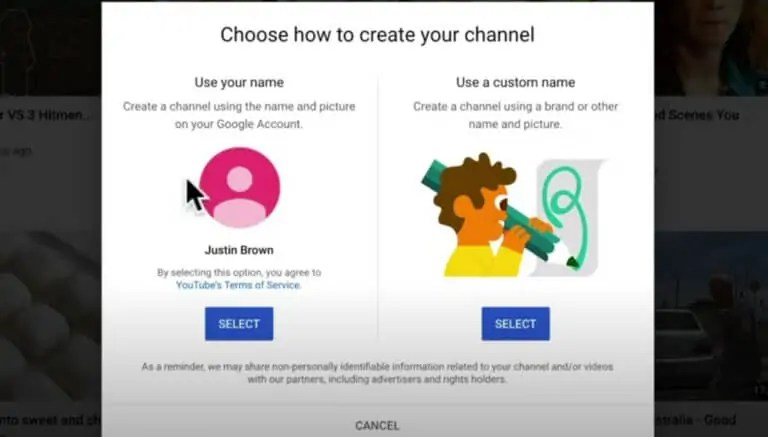
On the flip side, a brand channel gives you the option to create a custom name, and multiple emails can be linked to manage the account. Brand channels have a lot of advantages, especially if you’re aiming high for your channel and hope to see it grow.
Next Step: Create Your Channel Name
Once you’ve decided between a personal vs brand channel, it’s finally time to create your channel name. Type it in, then just check the box stating you agree to the terms and click Create.
Picking a channel name isn’t the easiest thing to do, so if you want helpful pointers on the name-choosing process, check out our guide on the 6 Steps to Pick Your Channel Name.
2: How to Customize Your YouTube Description
Now that your YouTube channel has officially been created and named, it’s time to customize it!
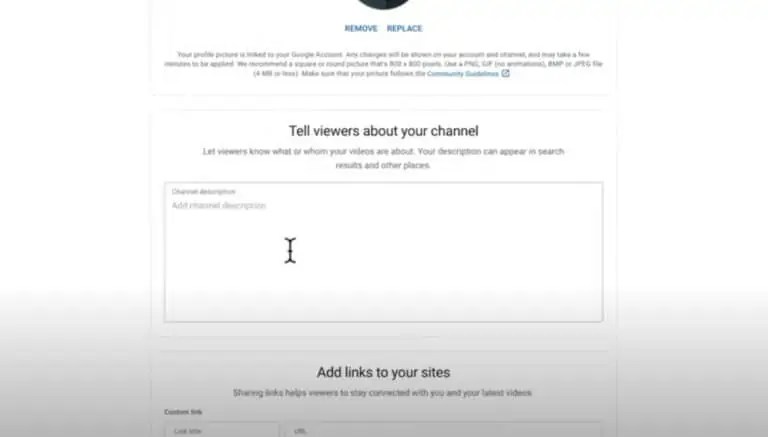
To start, upload a profile picture or avatar that will serve as a good representation of your channel.
Next Step: Create Your Channel Description
Next, add in some basic information about your channel to let viewers know what you’re all about. This will be inputted in the Tell viewers about your channel text box. This text will be displayed on the About page describing your channel.
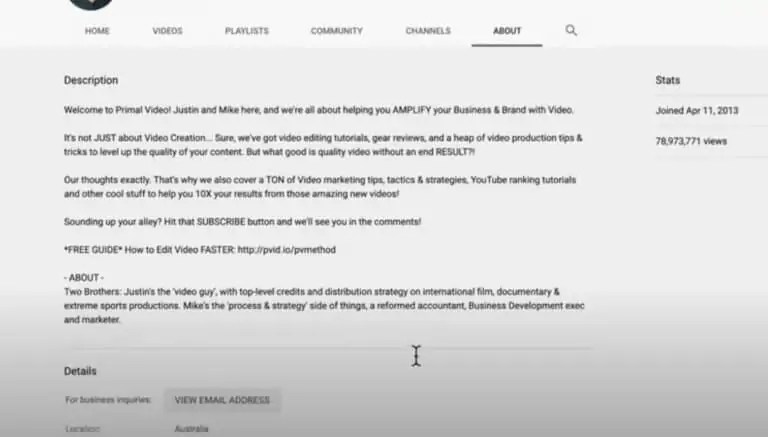
To give you an idea of what can be included in your page description, here’s our description for Unixtz
Best Tip: Optimize Your Channel Description!
The main thing to remember about your channel description is that this is the perfect opportunity to start optimizing.
Not only are you trying to tell your audience what you’re about with this description, but you’re also telling YouTube. Keywords and key phrases play a big role in how YouTube ranks its content, so you definitely want to sprinkle those throughout your description page.

Let’s use Primal Video’s description as an example. We use phrases like video creation, video editing tutorial, gear reviews, video production tips, video marketing tips, and more. This wasn’t an accident!
Because each of these phrases relates to our brand and image, it not only gives our viewers insight into who we are, but it also gives YouTube the inside scoop on our key topics covered.
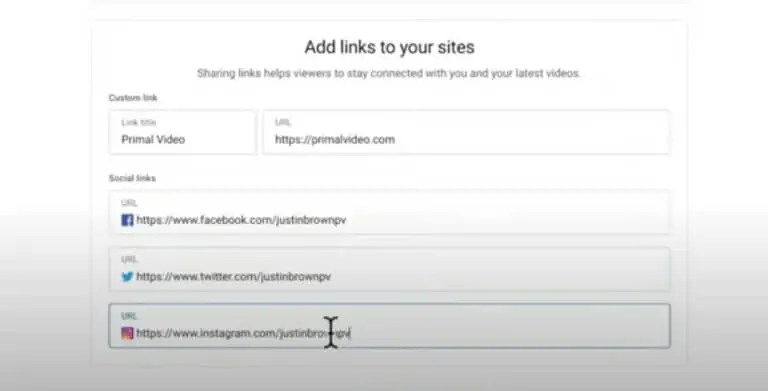
Next Step: Add Links to Your Sites
The last step to customize your description is to add in some links leading directly to your websites and social media accounts – think Twitter, Instagram, Facebook, etc.
After you’ve inputted your links, just hit Save and Continue before moving on to the next step.
3: How to Customize Your YouTube Channel
You’ve just finished customizing your description, so it’s now time to customize the actual channel and its settings.
After saving all the changes on the description page, you’ll be redirected to the channel dashboard where you can start customizing even more.

o customize your channel:
- Click on the blue Customize Channel button
- Then click on the Customization tab in the YouTube dashboard on the left of the screen. You can access this screen at any point by clicking on your profile icon and selecting YouTube Studio
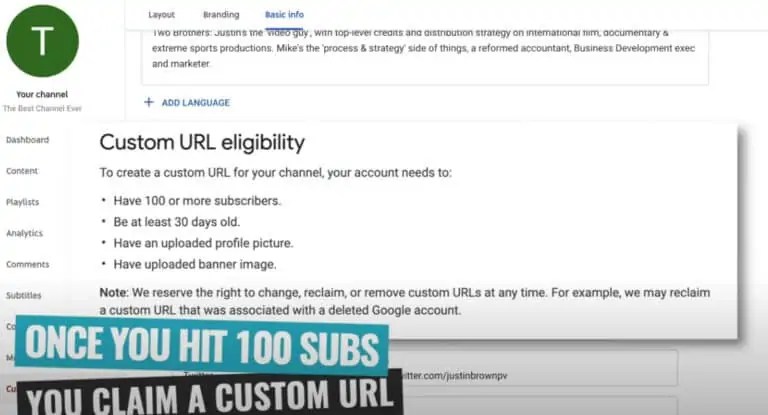
- Once on the customization page, there will be 3 tabs at the top of the page: Layout, Branding, and Basic Info. The Basic Info page will display the channel description you added early as well as your channel URL.